
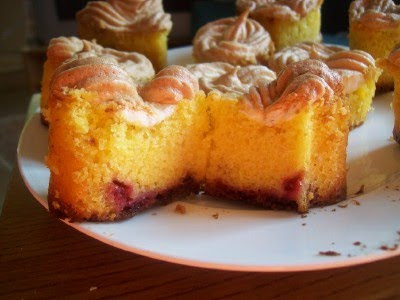
The cake was delicious, easy and much loved here !
You can find a printable recipe here and visit the other Cake Slice Members for more views !


Recipes:
Three Spice Liver Pâté
Yields one 25 by 12,5 cm (10 by 5 inch) terrine or loaf pan
1 lb / 454 grams pork liver (or beef or combination)
1/2 lb / 227 grams ground pork
1/2 lb / 227 grams pork fat (or pork belly)
2 cloves garlic
2 shallots
1 whole egg and 1 egg yolk
1/2 tsp / 2 ml cinnamon
1/2 tsp / 2 ml coriander (ground or crushed)
1/2 tsp / 2 ml cumin
3/4 tsp / 3 ml salt
1 tbps / 15 ml coarse freshly cracked peppercorns
2 tbps / 30 ml cognac
2 bay leaves
1 package of bacon
Preheat oven to to 350ºF (180ºC).
Cut liver and pork fat into small pieces and add to food processor. Add ground pork, garlic, shallots, cinnamon, cumin, coriander, salt and pepper. Grind until smooth.
In mixing bowl, incorporate the meat and liver mixture with the cognac and eggs.
Line bottom of baking or ceramic pan with overlapping pieces of bacon. Place a bay leaf on the bottom and then fill with meat/liver mixture. Cover top with another bay leaf and then overlapping pieces of bacon.
Place in oven in the larger baking pan and add enough water to cover 2/3rds of the pan containing the meat/liver mixture. Bake for about 1-1.5 hrs.
The pâté will contract and the juices will be on the bottom. Allow to cool and soak up the juices. Remove any excess bacon and discard the bay leaves.
Chicken Liver Terrine
Yields one 25 by 12,5 cm (10 by 5 inch) terrine or loaf pan
1 tbsp duck fat, or butter
2 onions, coarsely chopped
300g (11 oz) chicken livers, trimmed
3 tbsp brandy, or any other liqueur (optional)
100g (3 1/2 oz, 1/2 cup) smoked bacon, diced
300g (11 oz) boneless pork belly, coarsely ground
200g (7 oz) boneless pork blade (shoulder), coarsely ground (or ground pork see note below)
2 shallots, chopped
1 tsp quatre-épices (or 1/4tsp each of ground pepper, cloves, nutmeg and ginger is close enough)
2 eggs
200 ml (7 fl oz, 3/4 cup + 2 tbsp) heavy cream
2 fresh thyme sprigs, chopped
Salt and pepper
NOTE: If you cannot find ground pork belly or blade, buy it whole, cut it into chunks, and pulse in the food processor. You can also replace the pork blade with regular ground pork.
Preheat oven to 200ºC (400ºF, Gas Mark 6).
Melt the fat or butter in a heavy frying pan over low heat. Add the onions and cook, stirring occasionally, for 5 minutes, until softened. Add the chicken livers and cook, stirring frequently, for about 5 minutes, until browned but still slightly pink on the inside.
Remove the pan from heat. Pour in the brandy, light a match and carefully ignite the alcohol to flambé. Wait for the flames to go out on their own, carefully tilting the pan to ensure even flavoring. Set aside.
Put the minced pork belly and blade in a food processor, then add the onion-liver mixture and the chopped shallots, and pulse until you obtain a homogenous mixture – make sure not to reduce it to a slurry.
Transfer to a bowl, and gradually stir in the chopped bacon, quatre-épices, cream, eggs, and thyme. Season with salt and pepper, and mix well. Spoon the mixture into a terrine or loaf pan, and cover with the terrine lid or with aluminum foil.
Prepare a water bath: place the loaf pan in a larger, deep ovenproof dish (such as a brownie pan or a baking dish). Bring some water to a simmer and carefully pour it in the larger dish. The water should reach approximately halfway up the loaf pan.
Put the water bath and the loaf pan in the oven, and bake for 2 hours. Uncover and bake for another 30 minutes. The terrine should be cooked through, and you should be able to slice into it with a knife and leave a mark, but it shouldn’t be too dry. Refrigerate, as this pâté needs to be served cold. Unmold onto a serving platter, cut into slices, and serve with bread.
NOTE: This pâté freezes well. Divide it into manageable portions, wrap tightly in plastic film, put in a freezer Ziploc bag, and freeze. Defrost overnight in the fridge before eating.
Tricolor Vegetable Pâté
Yields one 25 by 12,5 cm (10 by 5 inch) terrine or loaf pan
Line your pan with plastic wrap, overlapping sides.
White Bean Layer
2 x 15-ounce / 900 ml cans cannellini (white kidney beans), rinsed, drained thoroughly
1 tbsp / 15 ml fresh lemon juice
1 tbsp / 15 ml olive oil
1 tbsp / 15 ml minced fresh oregano or 1 teaspoon dried
2 garlic cloves, pressed
Mash beans in large bowl. Add lemon juice, olive oil, oregano and garlic and blend until smooth. Season to taste with salt and pepper. Spread bean mixture evenly on bottom of prepared pan.
Red Pepper Layer
7-ounce / 210 ml jar roasted red bell peppers, drained, chopped
3/4 cup / 180 ml crumbled feta cheese (about 4 ounces)
Combine peppers and feta in processor and blend until smooth. Spread pepper mixture evenly over bean layer in prepared dish.
Pesto Layer
2 garlic cloves
1 cup / 240 ml fresh basil leaves
1 cup / 240 ml fresh Italian parsley leaves
1/4 cup / 60 ml toasted pine nuts
3 tbsp / 45 ml olive oil
1/2 cup / 120 ml low-fat ricotta cheese
Mince garlic in processor. Add basil, parsley and pine nuts and mince. With machine running, gradually add oil through feed tube and process until smooth. Mix in ricotta. Spread pesto evenly over red pepper layer.
Cover with plastic wrap and refrigerate overnight.
To unmold, invert pâté onto serving platter. Peel off plastic wrap from pâté. Garnish with herb sprigs and serve with sourdough bread slices.
Trout and Shrimp Pâté
Yields one 6x3 inch (15x7,5 cm) terrine or loaf pan
1 tbsp / 15 ml butter
1/4 lb / 4 oz / 120g medium raw shrimp, deveined, shelled and tailed (about 12 medium shrimp)
1/8 cup / 30ml Grand Marnier (or cognac, or another strong liqueur of your choice) (optional)
1/2 lb / 8 oz / 240g trout filet, skinned and cut into thick chunks
1/4 lb / 4 oz / 110g raw shrimp, deveined, shelled and tailed (any size)
3/4 cup / 180ml heavy cream
Salt, to taste
Green peppercorn, coarsely ground, to taste
Chives, for garnish
Preheat oven to 375ºF (190ºC).
In a heavy, flameproof frying pan, melt the butter over medium-high heat. Sauté the 1/4 pound of medium shrimp, stirring often, until pink and cooked through. Remove the pan from heat. (NOTE: These shrimp will be used to form layers within your pâté. If you feel they are too thick – like the ones in the photograph, you might want to slice them in half lengthwise.)
Pour the Grand Marnier over the cooked shrimp. Light a match and carefully ignite the alcohol, to flambé the shrimp. Wait for the flames to go out on their own, carefully tilting the pan to ensure even flavoring. Set aside.
Put the trout and the remaining raw shrimp in a food processor and pulse. Gradually pour in the cream and keep pulsing until you obtain a smooth mixture that is easy to spread, but not too liquid (you may not need to use all the cream). Season with salt and green pepper.
Butter a 6x3 inch (15x7,5 cm) loaf pan or terrine, then line it with parchment paper. Spoon in half the trout mixture, and spread it evenly. Place the flambéed shrimp on top, in an even layer, reserving 3 or 4 shrimp for decorating. Top with the remaining trout mixture.
Prepare a water bath: place the loaf pan in a larger, deep ovenproof dish (such as a brownie pan or a baking dish). Bring some water to a simmer and carefully pour it in the larger dish. The water should reach approximately halfway up the loaf pan.
Put the water bath and terrine in the oven, and bake for 35 minutes. The pâté should be cooked through and firm in the center.
Remove the pan from the water bath and let cool. Carefully unmold onto a serving platter. Decorate with the reserved shrimp, and sprinkle with chopped chives. Cut into thick slices and serve at room temperature, with crusty bread.


Preparation time: You will want to use your puff pastry batter and chocolate glaze or caramel as soon as it has been prepared and as close to serving time as possible. This is not a dessert that stores well and it may be a bit temperamental in humid areas as the glaze needs to harden to hold the choux together. The crème patissiere can be made a couple of days in advance and stored in the fridge until ready to use.
You will need approximately 10 minutes to prepare the puff pastry, 10 minutes to pipe and about 30 minutes to bake each batch. The crème patissiere should take about 10 minutes to cook and then will need to be cooled for at least 6 hours or overnight. The glazes take about 10 minutes to prepare.
Equipment required:
• several baking sheets
• parchment paper
• a whisk
• a pastry brush (for the egg wash)
• a pastry bag and tip (a plain tip or no tip is best for piping the puff pastry; you can use a plain or star tip to fill the puff pastry with the cream)
• a flat surface such as a baking sheet or cake board/stand on which to assemble your piece montée
• some of the items you may want to use to decorate your piece montée include ribbons, Jordan almonds, fresh flowers, sugar cookie cut-outs, chocolates, etc.
Ingredients:
For the Vanilla Crème Patissiere (Half Batch)
1 cup (225 ml.) whole milk
2 Tbsp. cornstarch
6 Tbsp. (100 g.) sugar
1 large egg
2 large egg yolks
2 Tbsp. (30 g.) unsalted butter
1 Tsp. Vanilla
Dissolve cornstarch in ¼ cup of milk. Combine the remaining milk with the sugar in a saucepan; bring to boil; remove from heat.
Beat the whole egg, then the yolks into the cornstarch mixture. Pour 1/3 of boiling milk into the egg mixture, whisking constantly so that the eggs do not begin to cook.
Return the remaining milk to boil. Pour in the hot egg mixture in a stream, continuing whisking.
Continue whisking (this is important – you do not want the eggs to solidify/cook) until the cream thickens and comes to a boil. Remove from heat and beat in the butter and vanilla.
Pour cream into a stainless steel/ceramic bowl. Press plastic wrap firmly against the surface. Chill immediately and until ready to use.
For Chocolate Pastry Cream (Half Batch Recipe):
Bring ¼ cup (about 50 cl.) milk to a boil in a small pan; remove from heat and add in 3 ounces (about 80 g.) semisweet chocolate, finely chopped, and mix until smooth. Whisk into pastry cream when you add the butter and vanilla.
For Coffee Pastry Cream (Half Batch recipe)
Dissolve 1 ½ teaspoons instant espresso powder in 1 ½ teaspoons boiling water. Whisk into pastry cream with butter and vanilla.
Pate a Choux (Yield: About 28)
¾ cup (175 ml.) water
6 Tbsp. (85 g.) unsalted butter
¼ Tsp. salt
1 Tbsp. sugar
1 cup (125 g.) all-purpose flour
4 large eggs
For Egg Wash: 1 egg and pinch of salt
Pre-heat oven to 425◦F/220◦C degrees. Line two baking sheets with parchment paper.
Preparing batter:
Combine water, butter, salt and sugar in a saucepan over medium heat. Bring to a boil and stir occasionally. At boil, remove from heat and sift in the flour, stirring to combine completely.
Return to heat and cook, stirring constantly until the batter dries slightly and begins to pull away from the sides of the pan.
Transfer to a bowl and stir with a wooden spoon 1 minute to cool slightly.
Add 1 egg. The batter will appear loose and shiny.
As you stir, the batter will become dry-looking like lightly buttered mashed potatoes.
It is at this point that you will add in the next egg. Repeat until you have incorporated all the eggs.
Piping:
Transfer batter to a pastry bag fitted with a large open tip (I piped directly from the bag opening without a tip). Pipe choux about 1 inch-part in the baking sheets. Choux should be about 1 inch high about 1 inch wide.
Using a clean finger dipped in hot water, gently press down on any tips that have formed on the top of choux when piping. You want them to retain their ball shape, but be smoothly curved on top.
Brush tops with egg wash (1 egg lightly beaten with pinch of salt).
Baking:
Bake the choux at 425◦F/220◦C degrees until well-puffed and turning lightly golden in color, about 10 minutes.
Lower the temperature to 350◦F/180◦C degrees and continue baking until well-colored and dry, about 20 minutes more. Remove to a rack and cool.
Can be stored in a airtight box overnight.
Filling:
When you are ready to assemble your piece montée, using a plain pastry tip, pierce the bottom of each choux. Fill the choux with pastry cream using either the same tip or a star tip, and place on a paper-lined sheet. Choux can be refrigerated briefly at this point while you make your glaze.
Use one of these to top your choux and assemble your piece montée.
Chocolate Glaze:
8 ounces/200 g. finely chopped chocolate (use the finest quality you can afford as the taste will be quite pronounced; I recommend semi-sweet)
Melt chocolate in microwave or double boiler. Stir at regular intervals to avoid burning. Use the best quality chocolate you can afford. Use immediately.
Hard Caramel Glaze:
1 cup (225 g.) sugar
½ teaspoon lemon juice
Combine sugar and lemon juice in a saucepan with a metal kitchen spoon stirring until the sugar resembles wet sand. Place on medium heat; heat without stirring until sugar starts to melt around the sides of the pan and the center begins to smoke. Begin to stir sugar. Continue heating, stirring occasionally until the sugar is a clear, amber color. Remove from heat immediately; place bottom of pan in ice water to stop the cooking. Use immediately.
Assembly of your Piece Montée:
You may want to lay out your unfilled, unglazed choux in a practice design to get a feel for how to assemble the final dessert. For example, if making a conical shape, trace a circle (no bigger than 8 inches) on a piece of parchment to use as a pattern. Then take some of the larger choux and assemble them in the circle for the bottom layer. Practice seeing which pieces fit together best.
Once you are ready to assemble your piece montée, dip the top of each choux in your glaze (careful it may be still hot!), and start assembling on your cake board/plate/sheet. Continue dipping and adding choux in levels using the glaze to hold them together as you build up. (You may want to use toothpicks to hold them in place – see video #4 below).
When you have finished the design of your piece montée, you may drizzle with remaining glaze or use ribbons, sugar cookie cut-outs, almonds, flowers, etc. to decorate. Have fun and enjoy! Bon appétit!
Additional Information: Here are some videos you may want to take a look at before you get started on your piece montée.
1) Martha Stewart Assembles a Croquembouche:
http://www.marthastewart.com/recipe/marthas-famous-croquembouche
2) Assembling croquembouche using the interior of a cylinder:
http://www.youtube.com/watch?v=Fq-UgMxe0Y4
3) Asembling Free-standing Croquembouche with Chocolate Glaze:
http://www.youtube.com/watch?v=ZrIanD5pi9E&feature=related
4) Assembling a Croquembouche with Toothpicks and Cone:
http://www.youtube.com/watch?v=vIGaidsM-NI&feature=related
See this google images search of Croquembouche for inspiration:
http://images.google.com/images?hl=en&source=hp&q=croquembouche&btnG=Sea...
Here’s a link to a dairy-free pate a choux and crème patisserie recipe:
http://dairyfreecooking.about.com/od/dessertsbeverages/r/creampuffs.htm


Ingredients
1½ pounds Fresh Anaheim chiles (about eight 6 to 8 inch chiles) 24 ounces 678 grams - roast, peel, remove seeds, chop coarsely. Other green chiles (NOT bell peppers) could probably be substituted but be conscious of heat and size!)
7-8 ounces Tomatillos (about 4-5 medium)212 grams - peel, remove stems
4 cups Chicken broth (32 ounces/920 grams)
1 clove Garlic, minced
2 teaspoons yellow onion, minced
1 teaspoon dried oregano
½ tsp Kosher salt (add more to taste)
¼ tsp Black Pepper (add more to taste)
2 tablespoons Cornstarch (dissolve in 2 tablespoons water, for thickening)
Hot sauce, your favorite, optional
2 Boneless chicken breasts (you can also use bone-in chicken breasts or thighs)
3 tablespoons Olive oil or other neutral vegetable oil (use more as needed)
Kosher salt and pepper
12 Small Corn tortillas (5-6 inch/13-15 cm). (you can also use wheat tortillas or other wraps)
6 ounces grated Monterey Jack, 170 grams (other cheeses (cheddar, pepper jack, Mexican cheeses) can be used. Just be sure they melt well and complement the filling)
Cilantro for garnish, chopped and sprinkled optional
Directions:
Roasting Fresh Chiles
1. Coat each chile with a little vegetable oil. If you are doing only a couple chiles, using the gas stove works. For larger batches (as in this recipe), grilling or broiling is faster.
2. Lay the oiled chiles on the grill or baking sheet (line pan with foil for simpler clean-up). Place the grill or broil close to the element, turning the chiles so they char evenly. They should be black and blistered.
3. As they are completely charred (they will probably not all be done at once), remove them to a bowl and cover with plastic, or close up in a paper bag. Let them rest until they are cool.
4. Pull on the stem and the seed core MAY pop out (it rarely does for me). Open the chile and remove the seeds. Turn the chile skin side up and with a paring knife, scrape away the skin. Sometimes it just pulls right off, sometimes you really have to scrape it.
5. DO NOT RINSE!
Green Chile Sauce
1. Put a medium saucepan of water on to boil and remove the papery outer skin from the tomatillos. Boil the tomatillos until soft, 5 to 10 minutes. You can also grill the tomatillos until soft.
2. Drain and puree in a blender or food processor.
3. Return the tomatillos to the saucepan along with the chicken broth, chopped green chiles, minced onion, oregano, garlic, salt and pepper.
4. Bring to a boil over medium-high heat and then reduce the heat and simmer for 10 minutes.
5. Add the cornstarch/water mixture and stir well. Simmer, stirring occasionally, until the sauce is thickened and reduced to 4-5 cups, another 10-15 minutes.
6. Adjust seasonings and add hot sauce if you want a little more heat.
Stacked Green Chile and Grilled Chicken Enchiladas
1. Heat a gas grill to medium high or build a medium-hot charcoal Coat the chicken with olive oil and season well with salt and pepper. Preheat oven to 450 degrees.
2. Grill the chicken until just cooked through, 4-5 minutes a side for boneless chicken breasts.
3. Cool and then slice into thin strips or shred.
4. In a small skillet, heat 3 tablespoons oil over medium-high heat until very hot. Dip the edge of a tortilla into the oil to check – it should sizzle immediately.
5. Using tongs, put a tortilla into the pan and cook until soft and lightly brown on each side, about 15-20 seconds per side (at the most).
6. Drain on paper towels.
7. Add oil as needed and continue until all 12 tortillas are done.
8. In a baking dish large enough to hold four separate stacks of tortillas, ladle a thin layer of sauce.
9. Lay four tortillas in the dish and ladle another ½ cup (4 ounces/112 grams) of sauce over the tortillas.
10. Divide half the chicken among the first layer of tortillas, top with another ½ cup of sauce and 1/3 of the grated cheese.
11. Stack another four tortillas, top with the rest of the chicken, more sauce and another third of the cheese.
12. Finish with the third tortilla, topped with the remaining sauce and cheese.
13. Bake until the sauce has thickened and the cheese melted, about 20 minutes. Let rest for 5-10 minutes.
14. To serve, transfer each stack to a plate. Spoon any leftover sauce over the stacks and sprinkle with cilantro, if you wish. The stacks may also be cooked in individual gratin dishes.
Additional Information:
Roasting chiles: Whether you roast the chiles on a grill, under the broiler, or use the gas burner element on your stove will affect the time it takes. If you do all the chiles at once on a grill or using the broiler, it will take 15- 30 minutes, plus time to steam (10 minutes) and time to peel and remove seeds (20 minutes).
http://www.ehow.com/how_5106125_roast-anaheim-peppers.html
http://www.ehow.com/how_4437304_roast-anaheim-green-chiles-grill.html
Cooking tomatillos: If you boil the tomatillos, it will take 5 -10 minutes. If you grill them, it will take 2-5 minutes. If you broil them, it will take 8-12 minutes. This can be done the same time the chiles are roasting. After they are cooked, they need to be pureed, which takes a few seconds in a blender.
http://culinarycory.com/2009/08/08/roasted-tomatillo-salsa/
http://jerseygirlcooks.blogspot.com/2009/02/roasted-tomatillo-salsa.html
Cooking chicken: If you grill your chicken, it takes about 5 or 6 minutes per side for boneless chicken breasts- depending on thickness of breasts. Other pieces (thighs, for example) or bone-in chicken will take longer. If you roast your chicken, a bone-in breast takes about 30 minutes (depending on size). Be sure chicken is done but not overcooked, since it will be in the oven in the last stage of the recipe.http://kalynskitchen.blogspot.com/2007/05/how-to-make-juicy-grilled-chicken.html
Corn Tortillas (from Rick Bayless’s Mexican Kitchen)
Makes about 15
1 3/4 cups masa harina
1 cup plus 2 tablespoons hot water
Pour hot water over masa harina, cover and let sit 30 minutes. Add (additional) cool water 1 tablespoon at a time until the dough is soft but not sticky. Divide the dough into 15 balls and cover with plastic wrap.
Heat a large (two burner) ungreased griddle or two large skillets, one on medium-low and one on medium-high.
Put a ball of dough between two sheets of plastic. If you don’t have a tortilla press, press to a 5-6” circle using a heavy frying pan or bread board or other heavy, flat object. Put the tortilla into the cooler pan or cooler end of the griddle. The tortilla will probably stick, but within 15 seconds, if the temperature is correct, it will release. Flip it at that point onto the hotter skillet/griddle section. In 30-45 seconds, it should be dotted with brown underneath. Flip it over, still on the hot surface and brown another 30 seconds or so. A good tortilla will balloon up at this point. Remove from heat and let them rest while cooking the remaining tortillas. Use quickly.


.jpg)


.jpg)


